
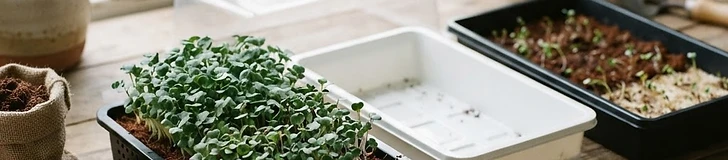
Embarking on a microgreen journey is one of the most rewarding ways to brighten your kitchen and boost your diet with homegrown nutrition. Because microgreens grow from seed to harvest in just 7 to 21 days, you do not need an acre of land or a massive greenhouse. Instead, you need a basic understanding of three core pillars: the container, the growing medium, and the seed quality. By selecting the right materials today, you set yourself up for consistent, healthy harvests that will keep your salads and sandwiches topped with freshness all year long.
Choosing Your Trays
Many beginners make the mistake of using repurposed containers like old plastic berry boxes. While these can work, they often lack the necessary drainage or structural integrity to hold damp soil. For the best results, invest in standard ten-by-twenty-inch nursery trays. You will need a set of two: one with holes for drainage and one solid tray without holes to serve as a reservoir. The drainage allows excess water to exit the medium, preventing mold and root rot, which are the primary enemies of indoor growers. In the United States, these standard trays are easy to find and fit perfectly on most wire shelving racks, making it simple to scale up as your confidence grows.
Selecting the Right Growing Medium
Your choice of medium acts as the anchor for your plants. While you can grow microgreens on mats made of hemp or bamboo, most home gardeners find success with a high-quality, fine-grade organic potting mix. Look for a mix that is light, fluffy, and free of large wood chips. You want the roots to be able to penetrate the medium easily without obstruction. If you prefer a soil-less approach, coconut coir is an excellent, sustainable alternative. Coir holds water exceptionally well, which is crucial for quick-growing crops like radish or arugula. Always moisten your medium before planting to ensure a uniform surface, which helps prevent seeds from sinking into deep air pockets.
Sourcing High-Quality Seeds
Not all seeds are created equal. Avoid buying generic packets from big-box hardware stores if you can, as these seeds are often treated with fungicides or intended for long-term outdoor gardening. For microgreens, seek out reputable seed companies that offer bulk bags labeled specifically for microgreen production. These seeds have higher germination rates and have not been chemically treated. Popular starter varieties include broccoli, radish, and kale. Broccoli is a favorite because it is incredibly reliable and mild in flavor, while radish offers a spicy kick and grows at lightning speed. Remember that when growing microgreens, you are planting seeds at a much higher density than you would for traditional vegetable gardening, so purchasing in bulk is significantly more cost-effective.
Practical tips
- Always hydrate your growing medium until it feels like a wrung-out sponge before you sprinkle your seeds.
- Use a spray bottle for the first few days of growth to avoid displacing delicate seeds with a heavy stream of water.
- Keep your trays in a dark area with a weight on top for the first 3 days to encourage strong, deep root development.
- Ensure your indoor temperature stays between 65°F and 75°F to prevent fungal growth or stunted development.
- Harvest your greens with a sharp pair of kitchen scissors just above the soil line to keep your final product clean and free of dirt.
Managing Light and Airflow
Once your seeds have germinated and been moved into the light, consistency is key. Place your trays in a bright location, such as a south-facing window, or use simple LED shop lights positioned about 6 to 12 inches above the canopy. If your greens look long, pale, and weak, they are likely stretching for light and need more intensity. Furthermore, do not underestimate the power of airflow. Even in a small home setup, a gentle oscillating fan set to a low speed will keep the air moving across the surface of the greens. This simple step reduces humidity and prevents dampening-off, a common fungal disease that can wipe out a tray overnight. Good air circulation acts as your most effective insurance policy.
Harvest and Storage
Timing is everything. Most microgreens are ready to harvest when they have developed their first set of true leaves, which appear just after the initial cotyledons (the seed leaves). Watch your plants closely; if they begin to look yellow or the stems become woody, you have waited too long. Once harvested, pat your greens dry if they are damp and store them in an airtight container in the refrigerator. Properly harvested and stored, they can stay crisp and flavorful for up to a week. Treat your harvest like a fresh herb rather than a vegetable, and you will enjoy the best texture and taste possible.
Quick takeaway
Use shallow nursery trays, high-quality organic soil, and untreated bulk seeds to master the basics of a healthy, productive indoor harvest.